Advice From a Not-Quite-Rookie Butcher

There’s a nip in the air today, bizarrely. At the football games these past two evenings, we’ve been grateful for the picnic quilt that’s always somehow left in the back seat. The cool night air got me to thinking of friends in Maine who are planning to butcher their own hogs for the first time very soon. We have to wait for colder nights before we tackle Levi and Sizzle, but it’s a good time to start mentally preparing.

This is the list of things we need to find, clean, sharpen and jury rig before the big day:

  1. A variety of knives
  2. A butcher’s saw
  3. A fairly level location with running water and something to hang the carcass from
  4. An indoor (bug and possum free) space to hang the halves
  5. A barrel and plenty of dry firewood
  6. A (working, ahem) vacuum sealer and plenty of bags
  7. Clean containers to sort sausage scraps and lard chunks into
  8. Trays for freezing or chilling chunks of meat and lard before grinding
  9. Plenty of freezer space
  10. A comealong
  11. A shovel
  12. Several heavy duty (200 lb+) zipties for hanging the hog.
  13. The gun

These are the things I wish we had known mistakes we made when butchering our hogs last fall. With a little preparation, this year will go much more smoothly.

  1. We usually always (we’re four for four on this) underestimate how long boiling water to scald the pig will take, especially since we use a metal barrel on an open fire, and there are a lot of variables there. It’s a lot of water, and it’s important early in the process, so give it a couple of hours. We haven’t successfully scalded and scraped either of the large hogs we’ve butchered (I suspect we haven’t gotten the water hot enough), but we’re going to try again. Sean has some particular cuts he’s hoping to get for charcuterie projects which will require that the skin be left on.
  2. I’ve twice found myself standing beside a wheelbarrow full of viscera, beating back exhaustion while chipping away at the ground with a shovel after dark. Dig a hole for unwanted guts and, if you aren’t scraping, the skin, well in advance of butchery. It’s awful doing this after dark, when you’re exhausted from manhandling a carcass, knowing that if you don’t take care of it, the coyotes will, and they’ll create a really truly disgusting mess, then eat your chickens.
  3. We once moved a 250-pound, mud-and-blood-covered hog into the pickup and then up a steep grassy hill, though our truck’s 4wd is questionable at best. If the hog is sizeable, shoot and stick it as near as possible to where you plan to hang it for evisceration.
  4. It’s hard to get the little bits of bark that inevitably fall from the tree off of the flesh and fat, so try to avoid hanging the carcass from a tree.
  5. When you halve the carcass, make sure you get a straight cut down the spine from the beginning. It’ll be hard to correct, and a botched cut will damage the loin (oh the pork chops!).
  6. Consider wearing a poncho or raincoat that can be soaped and rinsed with the hose to carry the halves to your workspace. They’re very heavy and awkward (Pinkie’s halves took three strapping farmers to shift) and you have to kind of hug them to your chest. You’ll get covered in lard, and it doesn’t wash out of winter work coats very well.
  7. I washed ground-in bits of raw fat out of the carpet once, and I hope to never do it again. If you’re butchering in your home, tape off a designated meat-free walkway through the room, and wear shoes that are easy to kick off and on for when you need to go grab the forgotten tool or hit the head or look something up on youtube. You will totally grease the area that you’re using, so plan ahead and avoid tracking chunks of flesh all over the house. Keeping the raw meat contamination zone contained did wonders for my stress level the second time we butchered.
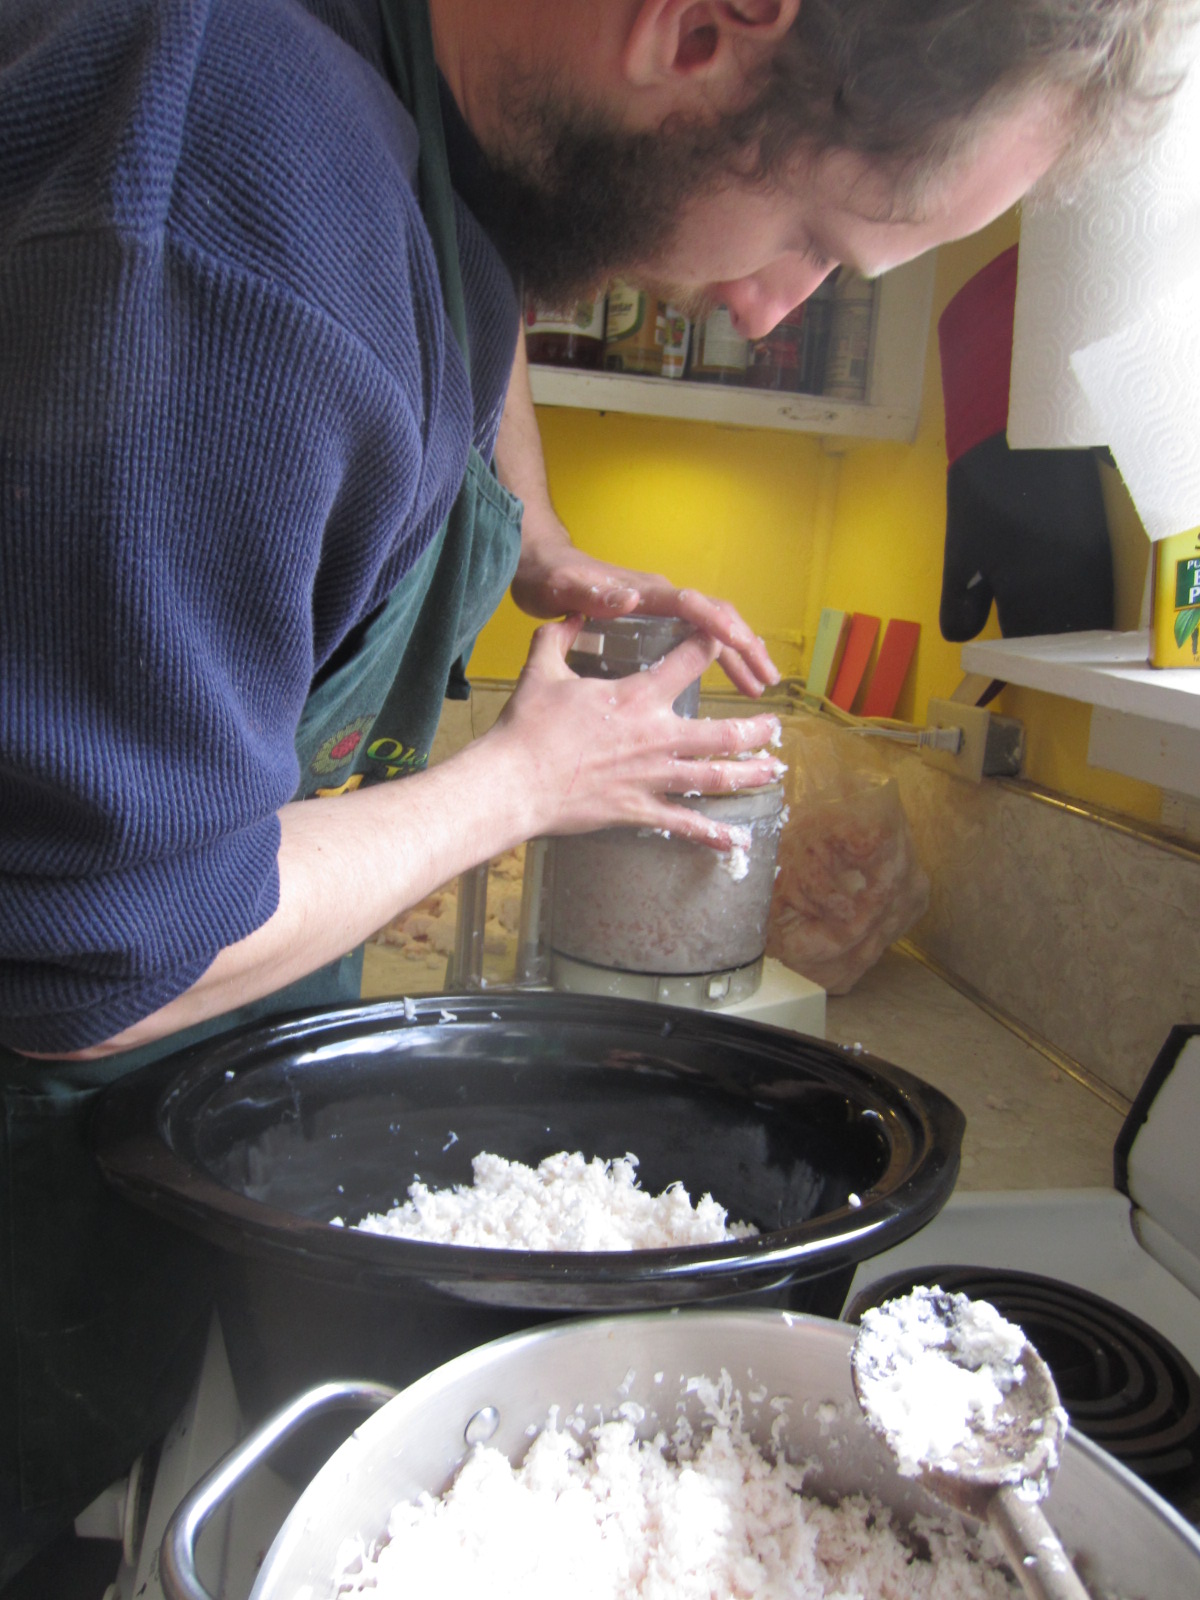
  8. We made the mistake of packing soft chunks of lard that we couldn’t process right away into grocery bags for freezing, and that resulted in twenty-pound lardbergs that had to be thawed and refrozen before grating. As you process each half, set aside the leaf lard for pastries and cooking and the caul fat (my friend says this is delicious wrapped around cubes of liver, seasoned with herbs, and grilled, though I can’t speak to this myself), and use the rest for soap. You can grind and render it immediately or freeze it, then grate and render it later. If you freeze it, freeze smallish chunks on trays and bag them afterward.
  9. Sausage (scraps and odd bits) should be ground cold. We ground it straight off the carcass, by which point it was approaching room temperature. Grinding it at room temperature causes the fat to separate and escape during cooking, making a less-tasty, denser sausage.
  10. Don’t freak out. Everything is washable.

No matter what, in the end, you will have some of the best meat you’ve ever eaten. The process is forgiving, and even those funny-shaped raggedy cuts with a little dirt on one side are delicious. Sprinkle some salt and pepper on some chops as soon as the last bit of the last pig is in the freezer and grill them up right away. It’ll put a smile on your face.

First Day of School Eve

I’ve been anticipating tomorrow for weeks now; I’ve had that sour porridge of dread and exhilaration churning in my gut since July ended. At 7:30 tomorrow morning, kids will be eating breakfast in the cafeteria, their backpacks smudging the waxed tile floors. Everything that the kids bring to the table, the mischief and brilliance and voltage and personality that I’ve been missing all summer will be back, and with it will come heedless cruelty, angst and funky smells (Simmons says that on stormy days, ninth graders smell like wet dogs) not to mention my own sleepless nights and daily failures.

The dread was at its most ferocious on Wednesday. The high school had professional development all afternoon, and a former colleague was leading the session.  It was an awesome session, but it knocked the breath out of me for a minute. “Think of what you most like to teach – that lesson that gets you most fired up, every year,” he said and I drew a complete blank. I love kids, and on good days, I love teaching, but I don’t love my content. I’m a math teacher by happenstance. “I’ll give you a little longer to think about that. Think about what fires you up about that objective. Why do you love it?” My mind was like a clear blue sky. “We all love what we do, that’s why we’re in this room: we want to give what we love to kids! If you can’t come up with something, get out of my profession.”

All the air came whooshing out of my lungs and I felt like crying. It was intended as a reminder that we got into this because we’re passionate about education, but for me it was a reminder that I’ll never be an exceptional math teacher because I will never be able to teach math from the heart. My placement in math was an arbitrary decision that some TFA person in an office somewhere made nearly three years ago. The consequences of that decision are shaping the rest of my life, and I’m sick with frustration over it. Math is the most sterile subject that we teach in school: there’s little art in it at the high school level, and it’s hard to create a math project that is aligned to the curriculum and has a practical application or a community impact. I asked to move, at least for a part of each day, into a different discipline for this school year, but with the major changes our district has gone through this summer, no one has gotten what they wanted.

The school isn’t putting its best foot forward this fall: teachers still don’t have rosters for tomorrow, and the schedule isn’t finalized yet. Our building, which held four grades last year and felt full, will now host six grades. My 18 crappy old desks were replaced with 29 nice new ones the other day. The electives have been moved into trailers. Somehow, though, I’ve let it all go for this evening. It was a great day, and I have never been so prepared for a Monday. Here’s a Ta-Da! list, which is the opposite of a To Do list, in terms of both its meaning and the feeling that it elicits in my breast.

Ta-Da!

  • We did tons of laundry today, and innovated by drying hanger clothes on the hanger. This saved space on the line, clothespins, and work on the tail end of laundrytime!
  • I made four little jars of pesto and stuck them in the freezer
  • Sean made a week’s worth of curry for lunches with our amazing homegrown lemongrass and thai basil.
  • We picked another batch of paste tomatoes
  • We ran three miles before breakfast
  • I made a gallon of dish soap, which should last us months.
  • We ordered Red Ranger chicks and arranged to sell some chickens to our friends in town. Super exciting!
  • I created a class jobs system
  • I finished setting up my classroom (this counts because it was after midnight last night before we left the school, right?)
  • Sean made a cheeseless pizza with arugula, prosciutto, and homegrown tomatoes that was to die for.
  • Lesson plans were completed by all.
  • Sean planted greens in the lower garden.
  • We both did countless small things for school. Really and truly countless.
  • We left the house clean. This never ever happens!

There’s an agitated part of me that thinks it’s all futile: there’s no front-end work that can make a whole year of school go smoothly. Preparing completely for just one week is an impossibility. There’s a different part of me that’s completely at ease tonight: There is simply nothing more that we can do before school starts except get in the car and crank up the radio for the sunrise drive to Palestine.

That’s where the exhilaration comes in: when you’re whipping up a two-lane highway through fields of cotton, screaming some silly pop country song at the top of your lungs, trying to chase the anvil-weight of nine months of responsibility off of your ribcage and out the window, and dancing like a fool in the driver’s seat where no one but the rising sun can see you. The exhilaration comes when you’re listening to another boring (sometimes alarming) professional development presentation (“You’ve got to crack down on them. When they graduate from here, they’re gonna at least know their manners. Doesn’t matter if they can read or write as long as they say ‘yes sir’ and ‘yes ma’am’ and know not to wear their hat in the house. That’s what will set them apart”) and you’re working on your syllabus and laughing at your own corny joke of putting a thinking cap on the supply list (not that I’d allow any sort of cap in the schoolhouse, no sir!). I get a rush when I think about learning the names on my roster (which will exist someday) and letting myself be smitten with a new group of kids.

Tonight I bid the summer adieu, but I’m welcoming with open arms another opportunity to fall ass over teakettle for a crop of quirky, sensitive, ruthless, ingenuous, imaginative, terrified kids. I’ll love them even on rainy days.

A week (and some) in pictures

Our first (pink) watermelon. It's hard to know when they're ready, and melons left in the garden too long invariably get devoured by the hungry Chunky family.

Our first (pink) watermelon. It’s hard to know when they’re ready, and melons left in the garden too long invariably get devoured by the hungry Chunky family.

IMG_2741

IMG_2769 IMG_2768

IMG_2773

round bars of soap! I used a pringles can for a mold, then just peeled the cardboard off.

round bars of soap! I used a pringles can for a mold, then just peeled the cardboard off.

The hardnecks are much less prone to rot in our climate, apparently

The hardnecks are much less prone to rot in our climate, so we’re taking another stab at dry storage.

Behold: The mid-summer potato harvest! We're putting in a fall crop in a week.

Behold: The mid-summer potato harvest! We’re putting in a fall crop in a week.

The cukes got a bit rambunctious and knocked down their trellis.

The cukes got a bit rambunctious and knocked down their trellis.

IMG_2736

Making Soap from Lard and Lye

This week, thanks to the leisurely summer school schedule, I’ve tanned my coon hide, dug potatoes, cleaned out the fridge, put up garlic and corn, and rendered something like four gallons of lard. Today, I aim to get a batch of soap curing. Soap making is a process that, for us, starts with a half a hog laid out on the kitchen table.

Butchering

When we butchered our pigs, we just heaped the lard up in piles to deal with later and focused on the cuts of meat. At the end of the day, we threw the heaps of fat-chunks in grocery bags and stuffed them in the freezer. This was a poor choice because 1) it was a waste of the high quality lard that we should have saved for pastries and the like and 2) we wound up with 25 pound “lardbergs” to contend with when we finally got around to rendering. I spent hours yesterday trying to cut a greasy fat-glacier into chunks that would fit into the food processor! Next time, we’ll sort the lard by quality, then freeze the (strategically sized) chunks on sheet pans and bag them once they’re frozen.

Meet Lardberg

Meet Lardberg. The fat never really freezes solid, so it quickly becomes slippery at room temperature and attempts to slime its way onto the floor like a snail with a shell made of fat.

Rendering

Rendering is the process of turning the chunks of fat that you’d find on the end of your porkchop into the buttery, smooth, shortening that you’d cut into your pie crust. We do it by grating chunks of frozen lard in the food processor and then putting the resulting shavings in the crockpot or in a pot on the stove over low heat.

Sean is grating the lard and rendering it in the two pots.

Sean is grating the lard and rendering it in the two pots.

The lard has to be very frozen to grate well. While dismantling the lardberg, we had to refreeze the chunks to get them to run smoothly through the grater. If you process enough lard this way, you’ll notice a buildup of white goo on the grater that resembles nothing so much as twinkie filling. The melting takes a while, but you don’t need to stir or monitor the pots. Most of the lard will turn to liquid and you’ll be left with floating, gray debris. At this point, strain the lard and set it aside.

yummmmm... If you have chickens, they'll love the fried McHeartattack Glop left in the strainer.

yummmmm… If you have chickens, they’ll love the fried McHeartattack Glop left in the strainer.

You can use it immediately if you’re making soap, or store it for later use in the fridge or freezer. It’ll solidify when it’s cool, but ours is liquid at what we call room temperature in Arkansas.

Mixing up the soap

You will need:

  • a couple of hours, most of which is wait-time
  • lard
  • lye
  • water
  • essential oils, herbs, whatever stuff you want to put in your soap
  • an accurate kitchen scale
  • kitchen supplies that you’re willing to sacrifice to soapmaking: a jar for mixing lye and water, something to measure lye into, a pot to mix the soap in, and a spoon to stir the lye and water mixture
  • something to use for a mold: a cardboard box lined with a plastic grocery bag works just fine
  • vinegar. SAFETY TIP: While mixing, know where your vinegar is, and have plenty. Vinegar will neutralize the lye if there’s an accident. Sean and I have made soap twice without a problem, but it’s better to be safe than sorry.

We’ve used the process and recipe described in this article from Mother Earth News. You weigh your lard, then calculate and double check how much lye and water to use. Add the lye to the water (NOT the water to the lye – this could splash lye around, which is dangerous) and let it heat up by the magic of chemistry and then cool to room temperature/slightly warm. This takes about an hour and it will get HOT, so make sure that you mix the lye and water in a place that you can count on to remain safely undisturbed for an extended period of time.

Measure carefully, then pour the lye into the water.

Measure carefully, then pour the lye into the water.

Carefully add the cooled water-lye mixture to the warm (95 degrees if you have a thermometer, warm when you touch the pot if you don’t) lard, plus any essential oils or goodies that you’d like to throw in there. We have used lavender oil and flowers to great effect, and we’ve just guessed at the amounts. Stir stir stir until the soap reaches the trace stage. This takes FOREVER. If it is at the trace stage, a drizzle of soap stays on top of the mixture. At this point, it’s ready to be poured into the mold. Don’t do it before it reaches trace: we made that mistake and had quite themess to contend with.

Shaping

When we have made soap in the past, we’ve lined cardboard boxes with plastic bags, poured and scooped the soap in, then let it sit overnight. By morning, it had stiffened up enough to cut.

behold my cunning use of a feed back as a box liner!

behold my cunning use of a feed back as a box liner!

The first time, it was still soft and we were able to cut it with dental floss. The second time, we let it sit too long and it was harder and more brittle. We had to cut it with a knife, and the bars cracked and split. We’ve only made rectangular bars, but I think I’d like to try different shapes this time if I can find appropriate objects to use for molds. I might cut the top and bottom off of a plastic bottle and try to make some round bars this time, or use a pringles can.

Cleanup

Carefully rinse anything that had lye in it with vinegar, then wash it normally. Some sources recommended that you label your soap making supplies and use them only for soap making. I leave the mess in the pot that the soap was mixed in, set it aside in a dark and ignorable corner, and wash it out when the soap is declared cured a few weeks later.

Curing

Lye soap must cure for at least two weeks before use, or it can burn the user. Some sources recommend waiting longer. I have laid out cardboard on the floor of the spare room or the dining table and spread the bars evenly on that, flipping them from time to time during curing. We haven’t had any hiccups in the curing part of the process: I think it’s pretty foolproof as long as you have some airflow and keep the soap away from children and pets (our cats were fine, but unlike dogs or children, they are very discerning about what they eat).

Curing

Curing! Our soap has lavender flowers in it: that’s the speckles.

The Product

The soap we make lathers wonderfully. The bars are hard, but the soap is smooth and creamy. I use it to make liquid hand soap (meaning I grate my bar soap and add warm water, then stick it in a dispenser) and dish soap, and when the huge container of laundry detergent I bought a year ago runs out, homemade laundry soap will replace that too.

If you’re planning to make your own soap, good luck! I can’t emphasize enough how rewarding it is to have all of our household soap coming from our land, animals and kitchen.

Tips for spending less money and putting less crap in landfills

I haven’t written a post quite like this before because I like to be very careful about how I talk about social and environmental issues. Words can be politically polarizing and I don’t like to be labeled an environmentalist because the label dismisses the other parts of my identity and the economic and social impacts of the way that Sean and I choose to live.

Thanks to Westwick Dreaming for the bounce over to My Make Do And Mend Year and for reminding me that it’s important to share these things. In the spirit of reusing, recycling and repurposing, this post lists some of the simple things that we do at the homestead, in addition to buying local, to minimize the stuff we throw in a landfill and the money that we contribute to businesses that don’t match our values:

Part 1: Recycling, Repurposing

  1. Sponges: I cut a corner off of a dish-sponge and it becomes a counter sponge. I cut a second corner off and it becomes a floor/nastiness sponge. After that, I throw it into a container on the back porch and it becomes an outdoor sponge. Sometimes the progression is shortened or modified depending on the needs of the moment, but the principle works well. This was inspired by the dish-sponge, bulkhead-sponge, sole-sponge, head-sponge progression I learned in my weeks with Ocean Classroom in middle school.
  2. Old rubber scraper: It became brittle and the end began to disintegrate, but instead of throwing it away, we hung it on a nail by the chicken fence and now use it to scrape out containers of nasty goop on its way into chicken-bellies.
  3. Packing materials: we keep a bag of them in our storage room and delight in mailing them back to our friends and family.
  4. Recycling: A lot of folks in our area don’t recycle. Even the progressive young teachers that we spend most of our time with are daunted by the absence of a curbside recycling service in our community and wind up discarding hundreds of pounds of recyclables each year. Sean and I use a set of three Rubbermaid tubs that fit in the trunk of our car. As one fills up, we pull it onto the porch and bring in another. We rinse our recyclables before throwing them in the tubs, which prevents critters from taking an interest and unpleasant odors from developing. We dump the tubs when we make trips to the city. Usually, this system works fairly smoothly, though we do occasionally produce too much recycling between trips.
  5. Clothes: if they’re good quality, we donate them, but if they’re too torn or stained, we toss them in my rag tub. I use them as cleaning rags or to make patches, potholders, and new seats for old chairs. I may also use small scraps in lieu of twine to build trellises and tie tomatoes. I saved the pockets from my old overalls and I’m planning to nail them up in our tool-storage area to use for small tools and bits of hardware.
  6. Tissue paper, gift bags and wrapping paper: I use wallpaper glue and make pretty lanterns with the tissue paper we save. Otherwise, this stuff gets folded neatly and stuffed in a drawer to be used next holiday.
    Pig Lantern
  7. Twist-ties and bread-tags: Stored in the junk drawer, these things come in handy from time-to-time. A bread-tag can be used to extend the life of a flip-flop when the strap pulls through the sole.
  8. Plastic grocery bags: We use these for covering bowls of rising dough, harvesting and storing greens, and in the place of paper towels for picking up dead mice and frogs that the cats dragged in. Thanks to the grocery store, we have never bought garbage bags: I stuck wall-hooks to our trash-can and they keep grocery bags from slipping into the bin when they grow full. Between composting and recycling, we don’t make a lot of trash, so this bag size works well for us.

    trash

    A photograph would have been actually gross, because the cupboard under our sink is a scary, scary place.

  9. Paper grocery bags: I store packing materials, clothes that aren’t in season, craft materials, and overflow recycling in these. They also make good table-covers for messy projects.
  10. Feed Bags: One of these on the porch makes a great trash-bag. They also make drop-cloths for painting, skinning or other messy projects.
  11. Egg Cartons: We use them over and over for our eggs. These would also make good packing materials if we were ever to run out.
  12. Yogurt containers, cans and peanut-butter jars:  I sort bits of hardware or rubber bands or twist ties into these, or use the lidded yogurt containers as backup tupperware.
  13. Jugs from vinegar or detergent: These make great scoops for feed.
  14. Compost: it’s easy and as a bonus, our trash never smells like garbage.

Part 2: Making from scratch

  1. Soap: We use the lard from our pigs to make bar soap. I often use the bar soap to wash my hair, and it can be grated to powder and mixed with borax and baking soda for use as laundry detergent. Liquid hand soap is easy to make out of the odd ends of the grated bars or bits scraped out of the pot: just add water and allow the soap to dissolve.
  2. Trellises: Bamboo (not to be mistaken for the native cane) is not indigenous to the forest here, so I feel no qualms about harvesting poles for trellising our tomatoes, cukes, peas and other climbing or trailing plants. I simply pound some canes into the ground and tie cross-bars to these uprights to provide support for my crops.
  3. Food: obviously, we grow a lot of food ourselves. I’m not sure this has saved us much money, (we’ve spent a lot on infrastructure in the past few years) but it helps us cut back on packaging materials that we have to throw away, and contributes to reducing emissions from shipping and chemical use in industrial agriculture.

Part 3: Minimizing by borrowing, buying used, or buying quality

  1. Books: I read a lot, and instead of buying books I go to the library or download for free. I pay a membership fee to use the library in Memphis, and it’s absolutely worth it. Supporting artists is important to me, but I’m not sure how to do this most effectively when it comes to authors: I don’t want a larger cut of my purchase going to a chain store or Amazon if I can help it. For now, I’m sticking with supporting libraries.
  2. Clothes: My clothes come almost exclusively from Goodwill and moving-out piles. This arrangement suits me because I don’t feel guilty discarding something that I don’t love as much as I thought I would if I hardly spent any money on it.
  3. Food Storage: We bought a set of pyrex containers that will last into the next century and totally eliminates the Tupperware-lid-matching problem.
  4. Furniture: Our furniture is all used or homemade, which I’m extremely proud of. It’s not all beautiful and it doesn’t match, but who cares? We’ll upgrade when we’re ready, probably piece by piece as I learn to refurbish nifty old stuff.
  5. Farm Equipment and Appliances: From lightbulbs to fencing, Sean does his research to make sure it’s durable, effective, and energy-efficient before we purchase anything new. We also get away with borrowing a lot of these items from our wonderful neighbors. Gifts of pork and garden veggies make these arrangements mutually beneficial.

Anything cool that I should be doing and haven’t thought of yet?